Learning how to make pap from scratch is more than just preparing a simple breakfast meal. It is stepping into a tradition that has quietly nourished generations across Nigerian homes and West Africa for decades. Long before modern packaged cereals became common, pap, also known as ogi, akamu, or koko was already a trusted kitchen staple prepared with patience, care, and love.

In many families, pap is one of the very first foods introduced to babies after breastfeeding, and it continues to remain a comforting meal for adults, the elderly, and even people recovering from illness because of how gentle and nourishing it is. It is smooth, warm, slightly tangy, and deeply satisfying in a way only traditional foods can be.
Even today, the aroma of freshly cooked pap in the early morning still signals comfort, home, and togetherness in many Nigerian households.
Why Every Mother Should Learn How to Make Raw Pap from Scratch

If you are a mother, planning to have children, or already raising babies and toddlers, then learning how to make pap from scratch is one of the most valuable kitchen skills you can have. Preparing your own pap at home gives you confidence in what your children are eating, especially in a time when many processed foods sold in the market cannot always be trusted for newborns and growing children.
Pap has been one of the foods mothers have used for generations to raise strong and healthy children. Personally, I did not grow up eating packaged baby cereals. What my siblings and I were fed with was homemade pap prepared by our mother with care and patience. I still remember when she was preparing pap for our last born, Chinedu. She made it from scratch using corn, sometimes enriching it with simple ingredients like palm oil. We ate it happily and grew up healthy. In fact, I can hardly remember being taken to the hospital as a child. The first time I was seriously taken to the hospital was after my secondary school days, when I was preparing to enter the university. Looking back now, I strongly believe the natural foods we were raised on especially pap-played a big role in keeping us healthy.
In those days, my mother prepared pap mostly from corn she harvested from her farm. She would remove the grains from the cob, soak them, grind them, sieve them, and store the processed pap for the family. At that time, I did not know pap could also be made by combining other grains like millet and sorghum.
It was later, after I got married and we were living in Northern Nigeria during my husband’s posting, that I learned something new. One day at the market, I met a woman who asked what I came to buy. I told her I wanted corn to prepare pap for my baby, who was about six to eight months old then. She asked if I was using only corn. When I said yes, she smiled and told me I was missing something important. She explained that for babies especially, it was even better to add millet (jero) and sorghum/guinea corn (dawa) when preparing pap because of the extra nourishment they provide.
Millet (jero) and sorghum/guinea corn (dawa) are also among the most active grains commonly used when preparing Kunu drink, because they are naturally rich in nutrients that support proper nourishment of the body. If you would like to learn how to prepare Kunu at home step by step, you can also read my detailed guide here.
She kindly showed me where to buy them and even shared the measurement with me. She suggested using two measures of corn and one measure each of millet and sorghum. And, She also advised me to add a little ginger. I followed her instructions, and truly, the result was wonderful. My son enjoyed the pap so much, and I personally noticed positive changes in his strength and growth. From that day, I continued preparing pap that way.
What Pap Really Is and Why It Is So Nourishing

Pap, also known as ogi, akamu, or koko, is a smooth fermented cereal meal traditionally prepared by soaking grains like corn, millet (jero), or sorghum/guinea corn (dawa) for one to three days, grinding them, sieving the mixture, and allowing it to ferment naturally before cooking. This fermentation process improves both the taste and the nutritional value, making pap gentle on the stomach and suitable even for babies.
Pap can be prepared using:
- only corn
- only millet (jero)
- only sorghum/guinea corn (dawa)
- or a combination of all three grains
Many families today prefer combining the grains because the mixture provides richer nourishment for growing children and adults.
Some mothers also improve pap further by:
- adding a little ginger during processing
- mixing small quantities of soybeans
- adding groundnuts in moderation
- or enriching the prepared pap later with soy powder or groundnut powder before feeding the child
Each method is acceptable. What matters most is learning how to prepare clean, healthy pap yourself from the comfort of your home instead of depending completely on store-bought versions whose preparation methods you may not know.
A Loving Invitation to Learn This Simple but Powerful Skill
If you are here to learn how to make pap from scratch either for your home or even for small-scale selling, this guide will walk you through the process step by step. One good thing about preparing pap yourself is that you can process it in large quantities and store it for future use.
As someone who loves caring for her family through healthy meals, I encourage every mother and every home to learn this simple traditional method. Whether you are preparing pap with corn, millet, sorghum, or a combination of all three, the process remains almost the same and once you learn it, it becomes a lifelong skill.
Now let me hold your hand as I walk you through the step-by-step process of preparing pap from scratch.
Tools Needed to Make Raw Pap from Scratch
The tools required to prepare pap from scratch are simple and easy to find, but each one plays an important role in getting smooth, clean, and well-processed pap whether you are preparing it for home use or for small-scale production.
Here are the tools you will need:
1. Blender, Food Processor, or Industrial Grinding Machine
This is used for grinding the soaked grains.
- If you are preparing pap in small quantities for family use, a strong blender or food processor works well.
- If you are processing large quantities for storage or for selling, it is better to use an industrial grinding machine.
2. Large Bucket with Cover
You will need a clean, sizable bucket with a lid for soaking the grains such as corn, millet (jero), and sorghum/guinea corn (dawa). Covering the bucket helps keep the grains clean during fermentation.
3. Muslin Cloth or Cheesecloth
A muslin cloth (sometimes called pap sieving cloth) is used for sieving the blended grains to separate the smooth pap slurry from the chaff. This helps produce soft and lump-free pap.
4. Pap Pressing Bag (Fermentation Bag)
This is the strong cloth bag commonly used locally for draining excess water after sieving pap or cassava. It allows water to drain slowly without losing the pap paste. Some people also call it a pap draining bag or fermentation bag.
5. Large Bowl
You will need a big bowl to collect the sieved pap slurry after grinding.
6. Small Bowl or Cup
A smaller bowl or cup is useful for adding water gradually during the sieving process.
These simple tools are enough to successfully process pap from scratch either for home use or for small-scale production.
Ingredients Needed to Make Pap from Scratch (Corn, Millet and Sorghum/Guinea Corn Blend)

The ingredients below are what I personally used for this recipe. Although this batch was prepared for my family, I usually process pap in larger quantities so it can last us for months. This is one of the ways I practice slow motherhood—planning ahead, reducing daily stress in the kitchen, and still making sure my family eats healthy homemade food consistently.
Whenever I prepare pap, I like to process enough to store in the freezer so it can serve us for a long time. Just like when I cook soup in large batches, preparing pap this way helps my home run smoothly while giving me time for other important responsibilities.
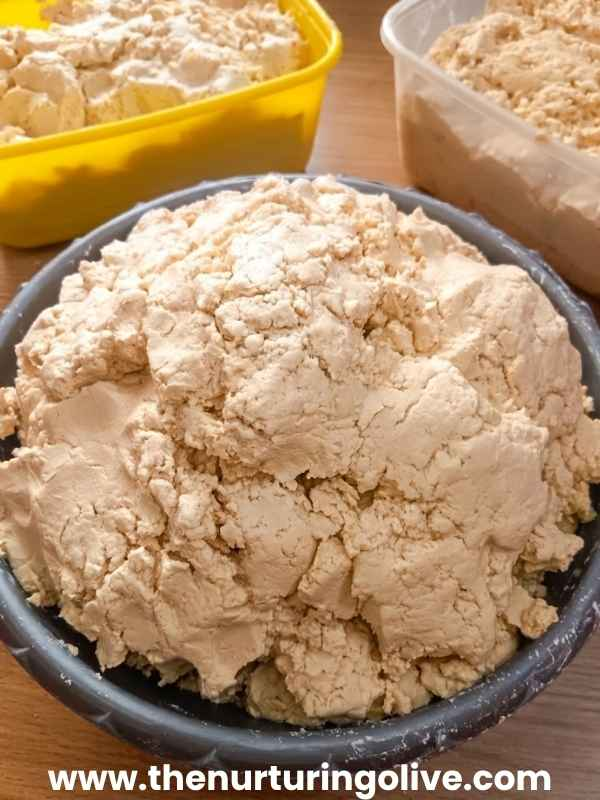
For this batch, the quantity I prepared filled five large freezer storage containers, and it can comfortably last my family for about three months.
Here are the ingredients I used:
Yellow Corn – 6 mudus
Corn is the main base ingredient for pap.
(“Mudu” is a common local measuring bowl used in Nigerian markets.)
Millet (Jero) – 2 mudus
Millet adds extra nutrients and improves the texture and richness of the pap.
Sorghum/Guinea Corn (Dawa) – 2 mudus
Sorghum supports digestion and adds additional nourishment, especially for growing children.
Fresh Ginger – about 300 grams
Ginger improves flavor and supports digestion. It also gives pap a mild natural warmth that many families love, especially when preparing pap for children.
Optional Ingredients Some Families Add
These are optional and were not included in this batch, but some mothers like to add them for extra nourishment:
- small quantity of soybeans
- small quantity of groundnuts
However, if you are preparing pap from scratch for the first time, I recommend starting with:
corn + millet + sorghum/guinea corn + ginger
Once you become comfortable with the process, you can begin adjusting the recipe to suit your preference.
Some families also prefer adding soybean powder or groundnut powder after cooking the pap, instead of adding them during processing. Both methods are acceptable.
Step-by-Step Method for Making Pap from Scratch (Ogi / Akamu)
Now that we have gathered all our tools and ingredients, let’s begin the step-by-step process of how to make pap from scratch for both home use and small-scale or industrial purposes.
This is the exact traditional method used in many Nigerian homes, and once you understand it properly, you can repeat it easily anytime.
Step 1: Selecting and Cleaning the Grains
Start by carefully selecting your grains. You can use:
- white corn
- yellow corn
- millet (jero)
- sorghum/guinea corn (dawa)
Whichever combination you choose will still produce good pap.
Before soaking, carefully remove stones, dirt, and debris. Most grains bought from the market usually contain impurities, so it is very important to clean them well.
If you have time, this step is very important. However, if you are in a hurry, you can still wash thoroughly after soaking-but pre-cleaning is always better.
Step 2: Soaking the Grains (Fermentation Stage)
Transfer the cleaned corn, millet, and sorghum into a large bucket with a cover.
Make sure the container is large enough-at least 2 to 3 times bigger than the quantity of grains. This is important because the grains will swell and rise during soaking.
Add clean water until it covers the grains completely (about twice the level of the grains).
Then cover the container properly.
Leave it to soak for:
- 12 to 24 hours (recommended)
- or up to 48 hours (traditional fermentation method)
However, if you soak beyond 24 hours, ensure you wash it thoroughly to avoid a sour smell that is too strong. And wash it daily as well, and, do not let it sit for more than three days.

Step 3: Washing After Soaking
After soaking, wash the grains thoroughly.
I personally wash mine 3 to 5 times, even if they look clean, just to be sure everything is properly rinsed.
During washing, you will notice:
- floating chaff (remove them)
- light particles (discard them)
- some grains that are bad (remove them)
Continue washing until the water becomes clean and clear.
Step 4: Grinding the Grains (With Ginger Preparation)
After washing the grains thoroughly, the next step is grinding.
But before grinding, take your fresh ginger, wash it properly, and slice it into smaller pieces. This helps it blend easily and release its nutrients into the pap mixture.
Now transfer the washed corn, millet (jero), sorghum/guinea corn (dawa), and the sliced ginger into your grinding machine.
You can use:
- a blender or food processor (for small quantities)
- an industrial grinding machine (for large quantities or commercial use)
If you are using an industrial machine, ensure you supervise the process and request a very fine grinding. For best results, the mixture should be ground at least 3 to 4 times until it becomes very smooth.
The smoother the mixture, the better the final pap will turn out. A well-ground mixture ensures a silky texture when cooked and prevents lumps during preparation.
Step 5: Mixing and Diluting the Batter
After grinding, pour the mixture into a large container.
If your quantity is large, divide it into portions for easier handling.
Add clean water gradually and stir very well until it becomes a smooth, flowing batter.
This step is very important.
Your mixture must be:
- smooth
- lump-free
- and watery enough to pass through a cloth easily
If it is too thick, it will not sieve properly and will waste time.
Step 6: Sieving the Pap (Removing the Chaff)
Prepare your muslin cloth or chiffon cloth by tying it over a bowl or holding it securely over a container.
Pour the batter into it gradually while adding water little by little.
Use your hand to stir and press it gently so the smooth pap flows through while the chaff remains inside the cloth.
Repeat this process until all the mixture has been sieved.
If the chaff still looks heavy, add more water and continue washing it through the cloth until it becomes clean.
This is the secret to getting smooth, fine pap.

Step 7: Settling or Draining the Pap
After sieving, you now have a smooth pap slurry mixed with water.
You have two options depending on quantity:
Option 1: Large Quantity (Recommended for storage or selling)
Pour the pap into a muslin drainage bag (fermentation bag).
Tie it properly and hang or place it on a raised surface so water can slowly drain out.
Leave it for several hours until excess water is removed and the pap becomes thick and compact.
Then transfer it into clean containers for storage or freezing.
Option 2: Small Quantity (Home use)
If you are not processing in large quantity, simply leave the pap in a bowl or bucket.
After a few hours, the pap will settle at the bottom while water rises to the top.
Gently pour out the excess water without disturbing the pap.
You can store it directly in the fridge or use it immediately.

How to Cook Pap from Scratch for Eating (Smooth and Lump-Free)

Now that you have learned how to prepare pap from scratch at home, both for your home use and small-scale or industrial purposes, congratulations. You can now confidently go ahead and begin to prepare it for your family to enjoy.
At this stage, the next important thing is not just having good pap, but knowing how to cook it properly so it comes out smooth, soft, and perfect for eating.
For many people, this is where the challenge usually begins. Some complain that their pap turns out lumpy, while others say it becomes too watery or does not give that smooth, silky texture they expect. If you have ever experienced any of these issues, you are not alone.
If that is your case, kindly click the link below. It will take you to a step-by-step guide I have prepared that will walk you through how to cook pap properly from your kitchen so that it comes out smooth, lump-free, and perfectly balanced every single time.
👉 Click here: How to Cook Pap (Smooth, Lump-Free & Perfect Consistency Guide)
How to Prepare Lumps-Free, Non-Watery Pap at Home (Step-by-Step Guide)
How to Serve Pap After Cooking (Simple Family Serving Ideas)
Once your pap has been properly prepared from scratch and cooked to a smooth, lump-free consistency, the next step is serving it in a way your family will truly enjoy.
In many homes, pap is mostly served as a nourishing breakfast because it is light on the stomach and rich enough to give energy for the day. It is especially delicious when served warm alongside Akara, Moi Moi, or even soft Cooked beans.
These combinations make pap more balanced and satisfying, especially for children and busy families who need something healthy but filling in the morning.
If you would like to prepare these side dishes yourself at home, you can also read my step-by-step guides on how to fry akara and how to make moi moi to serve together with your pap for a complete family meal
Crispy Nigerian Akara Recipe: How to Make Perfect Bean Cake at Home
Storage Method

If you do not have a freezer, don’t worry. Pap can still be preserved safely by changing the water every 24 hours. However, do not prepare too much at once, and always make sure you finish it within 2 to 3 days to avoid spoilage.
For long-term storage, divide the pap into portions, place them in airtight containers, and freeze immediately. This method helps it stay fresh for weeks, and when properly stored, it can last up to 2-3 months.
For my home, what I usually do is a little more organized. I keep both large and small containers in the freezer. But I always make sure the small containers are what I use for daily access.
“I always store pap in one small container among the big containers so I can easily thaw only what I need without disturbing the larger batch in the freezer.”
Kitchen Storage Tip (My Personal Method)
For my home, I use a simple storage system that helps me keep pap fresh and avoid waste.
I always store pap in both large and small airtight containers inside the freezer, but I mainly use the small containers for daily use.
Whenever I want to use pap, I bring out a small container because it thaws faster than the big ones. This helps me avoid constantly opening the large containers, which can affect freshness and hygiene over time.
I also avoid thawing a big batch, taking a portion, and returning it back into the freezer repeatedly. Instead, I work with small portions that are easy to thaw, use, and finish.
When a small container finishes, I simply refill it from the larger storage containers.
This method helps me:
- keep everything clean and organized
- prevent contamination
- reduce waste
- maintain freshness
Most importantly, it supports my slow motherhood lifestyle, where I plan ahead and keep my kitchen running smoothly without daily stress.
Slow Motherhood: Why the Wisest Mothers Are Choosing to Do Less and Be More
Frequently Asked Questions About How to Make Pap from Scratch
What is pap made from?
Pap (also known as ogi or akamu) is made from fermented grains such as corn, millet (joro), or sorghum (dawa). These grains are soaked, ground, sieved, and fermented before cooking.
How long does it take to ferment pap from scratch?
Pap usually takes 12 to 24 hours to ferment properly, although some traditional methods allow up to 48 hours depending on the desired sourness and weather conditions.
Can I mix corn, millet, and sorghum together when making pap?
Yes. In fact, many families prefer mixing corn, millet, and sorghum because it increases the nutritional value, improves taste, and makes it more filling and healthy, especially for children.
How do I store pap after processing it from scratch?
You can store pap in airtight containers. It can be kept in the fridge for a few days or frozen for up to 2–3 months if properly drained and stored.
Can pap be given to babies?
Yes. Pap is commonly used as a weaning food for babies. However, it should be properly prepared, well-cooked, and sometimes enriched with ingredients like soy powder or groundnut powder depending on the child’s age and dietary needs.
Final Thoughts on How to Make Pap from Scratch

Pap is one of the healthiest cereal foods you can ever give your children. There is deep joy in watching your family eat food you prepared yourself, knowing exactly what went into it.
That is why I always encourage mothers to take time, once in a while, to prepare pap from scratch and store it properly. You can dedicate one day in a month to prepare enough for your family, or even prepare in bulk that can last up to three months depending on your schedule and freezer capacity.
This is one of those simple habits that brings peace to your home. Your family benefits from healthy food, and your conscience is at rest knowing you are doing your best for them.
If you have ever felt unsure or overwhelmed, I hope this guide has shown you that how to make pap from scratch is simple, practical, and very achievable once you follow the steps carefully.
Explore More Delicious Step-By-Step Recipes From Our Kitchen
Now that you’ve learned how to make pap from scratch, I hope you feel more confident preparing healthy meals for your family at home. This is one of those simple traditional skills that truly makes a difference in your home.
If this guide helped you, If you enjoyed learning how to prepare this pap from scratch, you will definitely love some of our other traditional Nigerian step-by-step dishes already shared here.
You can also check out recipes like:
- Nigerian fried rice
- Ofe Nsala ( White Soup)
- Smoky jollof rice
- Healthy noodles without seasoning cubes
- Oha soup
- Bitter leaf soup
- Egusi Soup
- Ogbono Soup
- Afang Soup
- Edikang Ikong soup
- Black soup
- Ofe Akwu (Banga Stew)
- Unripe Plantain Porridge
- Kunu Drink
- Zobo Drink
More Than Recipes – Join Our Family Space
And if you are someone who enjoys more than just cooking content, you are warmly welcome to explore our other helpful lifestyle topics too.
We also share parenting stories, marriage content, Prayer & Spiritual Growth, Inspirational Stories & Drama and Christian Living & Faith posts to help and encourage families in different ways.
Do not forget to subscribe and stay connected for more updates. If you enjoy video content, you can also follow us on YouTube where we share practical cooking and lifestyle guides.
If you enjoy content like this, we would love to stay connected with you. Follow us on Facebook for our daily posts on parenting, faith, family life, and nutritious food ideas that help families live healthier and happier lives.
Facebook: The Nurturing Olive
Thank you for stopping by, and God bless you.

