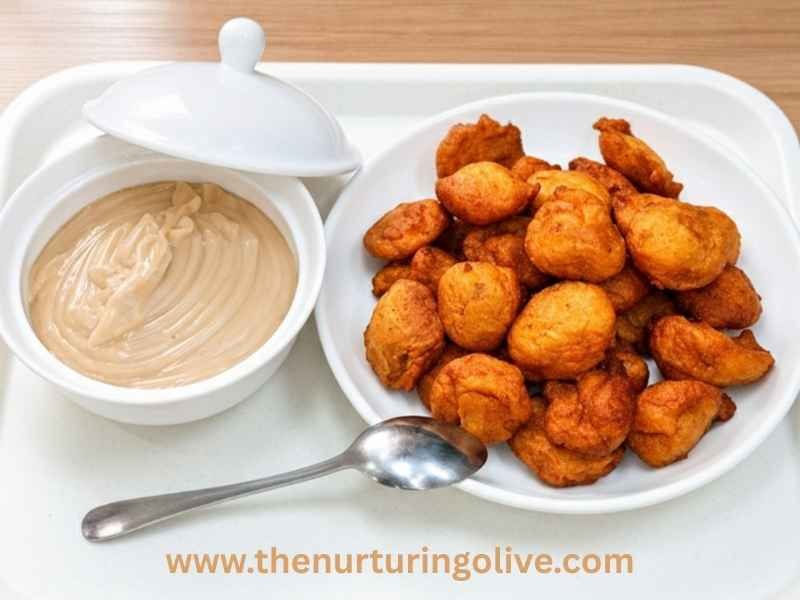
If you love Crispy Nigerian Akara, you’re in for a treat!
Crispy Nigerian Akara is more than just a snack. It is a taste of home, tradition, and comfort wrapped in golden, crunchy bites. Few foods evoke nostalgia in Nigerian kitchens like freshly fried akara sizzling in hot oil, filling the air with its irresistible aroma. Whether enjoyed on a quiet morning with pap or grabbed hot from a street vendor, akara has a way of bringing people together across generations.

Akara, known in English as bean cake, is one of Nigeria’s most beloved traditional foods. It is a deep-fried bean fritter made from blended beans, peppers, onions, and simple seasonings. Light on the inside and crispy on the outside, akara proves that humble ingredients can create extraordinary flavors.
Classic Nigerian Egusi Soup Recipe: Step-by-Step Guide from My Family Kitchen
What Is Akara?

Akara is a traditional Nigerian snack made primarily from peeled brown beans, black-eyed beans, cowpeas, or white beans. The beans are soaked, peeled, blended with fresh peppers and onions, seasoned with salt, then deep-fried until golden and fluffy.
Despite its simplicity, akara requires a gentle balance like proper bean preparation, correct oil temperature, and the right batter consistency to achieve that perfect crisp exterior and airy interior.
The Origin and Cultural Significance of Akara
Akara originated from the Yoruba people of southwestern Nigeria, where it is traditionally called Akara or Akara-jẹ̀ (Akarajẹ). Over time, it spread across Nigeria and West Africa, taking on regional names and variations.
-
Among the Hausa people, it is known as Kosai
-
Among the Igbo people, it is still widely called Akara
Through the transatlantic slave trade, akara found its way to Brazil, especially among Yoruba descendants in Bahia State, where it evolved into Acarajé. In Brazil, acarajé holds deep ceremonial and cultural importance and remains a proud symbol of Afro-Brazilian heritage.
From Nigerian street corners to Brazilian cultural festivals, akara tells a powerful story of survival, migration, and identity.
How to Cook Traditional Nigerian Oha Soup | Authentic Step-by-Step Recipe
My Little Story About Akara

Akara is one of the very first snacks I remember growing up with. I grew up in the eastern part of Nigeria, in a large and welcoming family compound located close to a busy walkway. Because people passed our area often, a woman once pleaded with my parents to allow her fry akara right in front of our compound. She was exceptionally good at it.
Every morning, we eagerly waited for her first batch to come out of the fire. Even on days when our parents didn’t buy, we would still gather around her frying spot. She often picked out the tiny crumbs that fell into the oil, those ones that she couldn’t sell, she will pick and shared them with us. Those tiny crunchy bits were special to us. They were extra crispy, perfectly fried, and unbelievably delicious.
We helped her set up the firewood, fanned the flames when the fire weakened, and stayed close, all in hopes of securing those little crunchy rewards. Akara became part of our breakfast routine, at least three times a week. We would buy akara and pap (ogi), a combination that pairs beautifully and fills you with comfort.
Even after we moved from the village to town, my love for akara didn’t fade. I gladly trekked long distances early in the morning to buy it, often joining long queues. There was something about starting the day with akara that simply made you smile and feel ready for the day ahead.
Why You’ll Love This Akara (And Why Nigerians Love It)
Akara has a special place in the hearts of Nigerians. Beyond nostalgia, akara is deeply loved because of its simplicity. It requires just beans, peppers, onions, salt, and oil, nothing complicated, yet the taste is rich and satisfying. It is quick to make, protein-rich, and very versatile. You can eat it with pap, bread, or even on its own as a snack.
Akara is often described as a “poor man’s food,” but in truth, it is a wise man’s food. When money is tight and you need something filling, akara comes through. Akara and pap (ogi) or bread together can stand as a complete meal, keeping you full and energized for hours. Today, it has moved beyond street corners and is now being served at small gatherings and events, showing just how timeless and valuable it truly is.
Click here to learn an easy, step-by-step method (with tips) for making lump-free, non-watery pap.
How to Prepare Lumps-Free, Non-Watery Pap at Home (Step-by-Step Guide)
Hindrances That Stop People from Trying Akara (And the Simple Solution)
One major reason many people avoid making akara at home is the stress of washing and peeling the beans. Removing the skins can be time-consuming and tiring, especially when cooking for a family. This is why many people prefer buying akara from vendors who are willing to go through that stress.
Growing up, we rarely made akara at home for this exact reason. The peeling process felt overwhelming. However, I later discovered that akara (and even moi moi) can be made without peeling the beans, and it still turns out beautifully.
The akara you see in these pictures was made with the bean skin intact. I skipped the peeling entirely, and the result was delicious, crispy, and satisfying. This doesn’t mean peeled-bean akara isn’t good-it absolutely is-but this method removes a major barrier for many people.
Interestingly, the skin of beans is rich in fiber, vitamins, minerals like potassium and magnesium, and antioxidants. Washing it off actually reduces the nutritional value of the dish. Keeping the skin means you’re enjoying a more wholesome and nourishing meal.
One important tip, though: if you want to try this method, use brown beans or honey beans. Beans with black “eyes” tend to leave dark specks when blended with the skin on, which some people may not find visually appealing. Brown or honey beans blend smoothly and still look almost like peeled beans, while retaining all the nutrients.
Since discovering this method, making akara has become easier, faster, and more enjoyable for me. It’s a reminder that sometimes, the things we see as obstacles simply need a better approach.
Edikang Ikong Soup Recipe: Healthy, Nutrient-Packed Nigerian Vegetable Soup
Tools Needed for This Crispy Nigerian Akara Recipe
Akara is a very simple snack, so it doesn’t require many tools. However, having the right equipment makes the process easier and ensures your akara turns out perfectly. Here’s what you need:
1. Frying Pan
The frying pan is essential, and its size depends on how much akara you’re making.
- For home use or family portions, a small to medium frying pan is enough.
- For business or selling purposes, a larger frying pan like those used by street vendors is recommended. A bigger pan allows you to fry more akara at once, saving time and fuel.
2. Blender or Food Processor
A good blender is key to getting smooth, fluffy batter.
- For home use, a regular kitchen blender or food processor works perfectly.
- For large quantities or selling, you may want to use a commercial grinding machine, often called a “wet mill” in local markets. Many street vendors offer this service if you don’t own one yourself. This is what I used for the large batch I fried for my family and visitors.
3. Frying Spoon (Slotted Spoon)
You’ll need a slotted spoon to safely remove the akara from hot oil.
- For home use, a regular slotted spoon works fine.
- For selling or large batches, use a bigger slotted frying spoon designed for street frying. These can handle more akara at once and make it easier to turn and remove them from the oil.
4. Tablespoon or Small Scoop
To add the bean batter into the hot oil, a tablespoon or small scoop is ideal.
- For home frying, a regular kitchen tablespoon works perfectly.
- For selling or large-scale frying, you may want a slightly bigger scoop or ladle to drop consistent portions quickly and safely into the oil. This helps the akara cook evenly and look uniform.
5. Mortar and Pestle (Optional but Recommended)
This is especially useful if you’re frying akara for sale. After blending the beans, the mortar and pestle help mix the batter thoroughly and achieve a smooth, even consistency. Street vendors almost always use this tool.
- If you don’t have a mortar and pestle, you can still use a strong mixing bowl and a sturdy spoon. You can achieve good texture with just a bowl, but the mortar and pestle make it easier to incorporate air into the batter.
6. Wire Mesh Strainer (Sieve)
After frying, you’ll need a way to drain excess oil from the akara. A wire mesh strainer or skimmer sieve is perfect for this. Simply remove the akara from the hot oil using your slotted spoon and place it in the strainer. This ensures the oil drains well, keeping your akara crisp and not greasy.
Ingredients Needed for This Crispy Nigerian Akara Recipe
Akara is a simple snack, but using the right ingredients in the right way ensures it comes out crispy, fluffy, and flavorful. Here’s what you need:
Beans (Brown Beans, Black-Eyed Beans, or Honey Beans)
The main ingredient for akara is beans. You can use peeled brown beans, black-eyed beans, or honey beans.
- Brown or honey beans are ideal if you want to fry akara without peeling the skins. They blend smoothly and still give a nice texture.
- Black-eyed beans are traditional, but if frying with the skin on, the black “eyes” will show in the batter, which may affect appearance.
Onions
Onions add flavor and aroma to your akara. Usually, one medium-sized onion is enough for a standard batch.
- They also help balance the taste of the beans and reduce the raw bean flavor after frying.
Fresh Peppers (Scotch Bonnet or Chili)
Peppers give akara its signature mild to spicy kick.
- Use 1-2 fresh peppers, depending on how spicy you like it.
- Blend them with the beans for a smooth, consistent texture.
Salt
Salt enhances the flavor of the akara and brings out the natural taste of the beans.
- Add to taste, usually ½-1 teaspoon for a standard batch.
Seasoning Cube (Optional)
A seasoning cube is optional but adds an extra depth of flavor.
- If using, crush it into the batter after blending.
Water
Water is needed to help blend the beans into a smooth batter.
- Use minimal water to keep the batter thick. Too much water will make the akara soggy instead of fluffy.
Vegetable Oil (For Frying)
Oil is essential for frying akara to a golden, crispy perfection.
- Use enough oil to deep fry, so the akara can float and cook evenly.
- Oil should be medium-hot, not smoking, to prevent burning and to allow the akara to puff properly.
Click here for a step-by-step guide to making authentic Black Soup.
How to Cook Healthy Black Soup – Edo State Traditional Nigerian Soup
Step-by-Step Method for Making Crispy Nigerian Akara at Home
Follow these steps carefully to make crispy Nigerian akara at home without mistakes. Remember, preparation and patience are key.
1. Prepare Your Ingredients and Tools
Before starting, gather all your ingredients and tools. Whether you are frying for your family or for sale, having everything ready will make the process smooth. Decide if you want to peel the beans or fry with the skins on. Both methods work perfectly.

2. Preparing the Beans
Option A: Using Unpeeled Beans (No Skin Removed)
- Carefully sort through the beans to remove stones, debris, and any bad beans.
- Rinse the beans briefly in water to remove dirt.
- Soak the beans in water for 10-60 minutes, depending on your schedule. This softens the beans and makes them easier to blend.
Option B: Using Peeled Beans (Skin Removed)
- Work in small batches to make peeling easier. Do not pour all the beans at once.
- Soak beans briefly in water. Using your fingers or a mortar and pestle, gently rub the beans to loosen the skins. Do not pound.
- Pour beans into water; the skins will float. Remove the skins carefully and repeat until all beans are peeled and the beans appear white.
- After peeling, the beans are ready for blending.
Tip: The skin of beans contains fiber, vitamins, and antioxidants, so using unpeeled beans is both nutritious and less labor-intensive.
3. Add Onions and Peppers
- Wash and peel the onions, then add them to the beans.
- Wash the fresh peppers (scotch bonnet or chili) and remove any bad spots. Add to the beans.
- These three ingredients which are beans, onions, and peppers are all you need for traditional akara. Optional additions like crayfish, ginger, or seasoning cubes can be added if desired.
4. Blend the Beans
- Blend the beans, onions, and peppers in batches, especially if using a home blender or food processor.
- Add a small amount of water if needed to allow the blender to run smoothly, but do not add too much. The batter should be thick and scoopable. See the attached images.
- If using a commercial grinder (wet mill), you usually do not need to add extra water.
Tip: The correct batter consistency is crucial for crispy akara. It should be thick enough to hold shape in oil but smooth enough to scoop easily.
https://thenurturingolive.com/healthy-no-sour-tomato-stew/
5. Mix the Batter
- Transfer the blended batter into a mortar and pestle or a strong mixing bowl.
- Add salt sparingly because beans are naturally flavorful. Over-salting can make the akara taste too strong.
- Use a spoon or the pestle to turn the batter gently and introduce air. This helps the akara puff up nicely while frying.

6. Heat the Oil
- Place your frying pan over medium heat. If using firewood, ensure it’s steady and even. If using gas, turn it to medium.
- Pour in enough oil for deep-frying and allow it to heat.
- The oil must be hot enough to fry the akara. If not hot enough, the akara will soak up oil and become greasy.

7. Fry the Akara
- Use a tablespoon or small scoop to drop the batter into the hot oil.
- Small spoonfuls are perfect for home frying. For business, larger scoops can be used to make uniform balls.
- The akara will float after a few seconds. Fry until the bottom turns golden brown, then flip to cook the other side.
- Fry in batches to avoid overcrowding, which can make them soggy.

8. Drain Excess Oil
- Remove the fried akara using a slotted spoon.
- Place them in a wire mesh strainer (or skimmer sieve) to drain excess oil. You can also place parchment paper under the strainer to soak additional oil if desired. Congratulations, your Crispy Nigerian Akara is ready to serve.
With this method, you can make crispy Nigerian akara with minimal oil, perfect texture, and great taste, whether using peeled or unpeeled beans.
Serve and Enjoy

You can serve hot with pap (ogi) or bread, or enjoy it as a side dish.
Akara is best eaten warm. Cold akara loses its crispiness and taste.
If frying for sale, serve immediately to customers. Fresh, hot akara is always preferred.
How to Prepare Lumps-Free, Non-Watery Pap at Home (Step-by-Step Guide)
Storage Tips
Akara is not meant for long-term storage. It tastes best when eaten immediately.
But, if you have leftovers, keep them in a dry place and consume within 24 hours. Do not freeze, as this will affect texture and flavor.
If it’s for business, fry only the quantity you can sell or serve in a day to maintain quality.
Healthy Noodles Without Seasoning Sachet: A Delicious, Family-Friendly Homemade Recipe
Tips and Twists for Making Crunchy Nigerian Akara at Home
If you want to achieve crispy, golden, irresistible Nigerian akara from the comfort of your home, follow these tips carefully. These small tricks make all the difference in texture, taste, and appearance.
Ensure the Oil is Hot Enough
- The secret to crispy akara is hot oil.
- Test the oil by dropping a small spoonful of batter; it should float quickly and start frying immediately.
- If the oil isn’t hot enough, the akara will soak up too much oil, making it greasy and heavy.
- Once the oil is hot, reduce the heat slightly. This ensures the akara cooks evenly inside without burning on the outside.
- Observe how street vendors adjust their fire-reducing the fire ensures perfect cooking without over-browning.
Be Careful with Salt
- Beans naturally have flavor, so add salt sparingly.
- Too much salt will make the akara unpleasant and unhealthy due to excess sodium.
- A well-balanced, lightly salted batter enhances the natural taste and allows the flavors of peppers and onions to shine.
Use the Right Peppers and Onions
- Peppers and onions are your secret ingredients for flavor and aroma.
- Use long red chili peppers (also called cayenne or Scotch Bonnet peppers) and regular red chili peppers for the perfect heat.
- Add enough onions for flavor balance.
- These are all you need. No need for extra ingredients like eggs, chicken, or other fillers. Simple, classic ingredients produce the most authentic and delicious akara.
Mix the Batter Well
- After blending, transfer the batter to a mortar and pestle or strong mixing bowl.
- Incorporate air into the batter by stirring gently but thoroughly.
- Ensure all ingredients are well combined; sometimes peppers separate during blending, especially if using industrial grinders.
- Test the batter—once it looks smooth, cohesive, and slightly airy, it’s ready for frying.
Maintain Proper Batter Consistency
- The batter should be medium-thick: not too watery, not too stiff.
- Too watery: The akara will spread in the oil, lose shape, and become soggy.
- Too thick: The batter will not puff well, and the texture will be dense.
- Adjust water carefully while blending to achieve a smooth, scoopable consistency that holds shape in hot oil.
Fry Carefully and Strategically
- Use a tablespoon or small scoop to drop batter into the hot oil.
- Fry in small batches, giving each piece enough space to float and cook evenly.
- Once the bottom is golden brown, flip the akara carefully to cook the other side.
- Avoid overcrowding the pan, as this reduces the oil temperature and results in soaky, unevenly cooked akara.
Drain Properly
- Use a slotted spoon to remove the akara from oil.
- Transfer them to a wire mesh strainer or sieve to drain excess oil.
- Optional: Place parchment paper under the strainer for extra oil absorption.
Serve While Hot
- Akara is best eaten warm. Cold akara loses crispiness and appeal.
- Serve with pap (ogi) or bread for a traditional Nigerian breakfast, or as a side dish with your favorite meals.
Extra Tips for Perfection
- If frying multiple batches, let the oil return to the correct temperature between batches.
- Adjust the heat carefully. Medium heat works best for even cooking.
- Always test one piece first before adding the entire batch to ensure perfect crispiness.
- Keep your batter covered while frying to prevent it from drying out or separating.
These simple tips and tricks will help you create crispy, golden, perfectly seasoned Nigerian akara that tastes just like the ones from your favorite street vendor but in your own kitchen.
Frequently Asked Questions
Can I fry akara with the skin?
Yes! Use brown or honey beans, soak slightly, and carefully remove stones. White beans with black eyes may leave unattractive spots.
Must the oil be very hot?
Yes. Hot oil ensures crispy akara without excess oil soaking. Reduce fire slightly after adding batter to cook evenly.
Which other ingredients can I add?
Traditional akara only needs beans, pepper, onions, and salt. Optional additions include crayfish or ginger.
Can I use a blender or food processor?
Yes, ensure it’s powerful enough to produce a smooth batter. For industrial-quality results, consider using a commercial grinder.
Do I add water?
Yes, a little water to help blend. Avoid too much, or the batter becomes runny and difficult to shape.
Health Benefits of Akara
Akara is Protein-rich: Supports muscle growth and keeps you full.
High in fiber: Promotes digestion and gut health.
Vitamins & minerals: Folate, magnesium, potassium, and iron.
Cholesterol-free: Heart-friendly snack.
Antioxidants: Help fight inflammation and protect cells.
Energy-boosting: Great for breakfast or mid-morning snack.
Classic Nigerian Egusi Soup Recipe: Step-by-Step Guide from My Family Kitchen
Final Thoughts

Akara is a timeless, simple snack that’s loved across Nigeria and West Africa.
Its simplicity, quick preparation, and delicious taste make it a favorite for children and adults alike. Whether you’re looking for an easy, healthy snack to prepare at home or a small business opportunity, akara is a fantastic choice.
Many people have found crispy Nigerian akara to be a profitable venture, especially women and even elderly vendors, who continue to earn daily from selling it. Its wide acceptance and timeless appeal make it a snack that will always find a market and a place at the table.
So, whether for your family or for business, crispy Nigerian akara (bean cake) is easy to make, loved by all, and truly worth trying.
How to Prepare Lumps-Free, Non-Watery Pap at Home (Step-by-Step Guide)
Let’s Hear from You!
Have you ever tried frying akara at home? What’s your secret to making it crispy and irresistible?
We’d love to hear your thoughts! Comment below, share your tips, or let us know how your akara turned out. Don’t forget to react and share this recipe with your friends and family so they can enjoy it too.
If you love exploring Nigerian recipes, check out our other delicious guides:
- How to cook Oha soup (Ofe oha)
- How to make moimoi with simple ingredients
- How to cook noodles without seasoning sachets for a healthy twist
- How to cook Edo State black soup
- How to make the most delicious five-star restaurant egusi soup at home
- How to cook Vegetable Edikang Ikong soup
- How to cook most healthy Tomato Stew at home
- How to prepare lump-free, non-watery pap at home and more!
And if you enjoy family-related posts, parenting tips, or marriage and relationship guidance, explore our other articles on parenting, marital bliss, inspirational stories and drama, and everyday life lessons.
For readers who love stories, you can also check out our captivating stories like
Subscribe to our blog for more family meals with authentic step by step guide, powerful family dramas, real-life inspired stories, and lessons on godly parenting & family life, marriage, prayer & spiritual growth, and healthy food and drinks that strengthen homes from the inside out.
Please take your time, explore, and enjoy. There’s always something special waiting for you here and don’t forget to subscribe so you won’t miss new recipes, family posts, and kitchen inspiration shared with care and love.
Thank you so much for stopping by today. I truly appreciate you always.
Also, don’t miss our Godly films on YouTube. They are stories that bring faith to life in powerful, relatable ways. They’ll encourage you, inspire you, and help you see God’s hand in everyday moments.
Watch here: Christ Love Crusaders Ministries YouTube Channel

