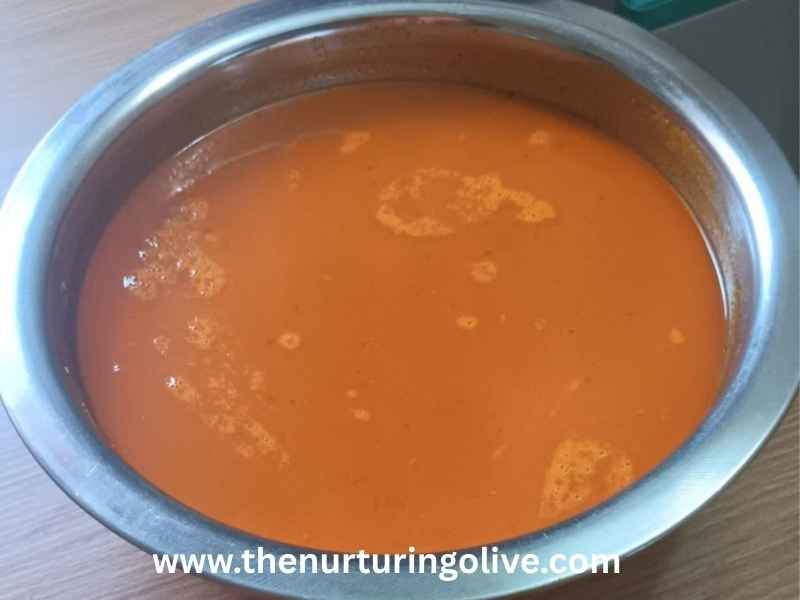
A lot of our rich African dishes truly shine only when they are prepared with fresh palm fruit juice. If you want that authentic traditional taste, the deep appetizing color, and the original aroma, you cannot compare palm fruit juice with palm oil at all.
In fact, it’s not every dish you can substitute with palm oil. No matter how much palm oil you add, it still won’t give you the real taste, the rich texture, or the beautiful traditional look that comes from cooking with fresh palm fruit juice. Many people who use palm oil as a substitute do so simply because they don’t have a choice at that moment not because palm oil can ever do the same job.
But when you do have a choice, please always use palm fruit juice. Especially when you want that true traditional method, the same way our forefathers prepared their soups and stews. Some of the popular dishes that traditionally require palm fruit juice (not palm oil) are:
- Black Soup (Edo)
- Bitter Leaf Soup – Ofe Onugbu (Igbo)
- Oha Soup – Ofe Oha (Igbo)
- Banga Soup / Banga Stew – Ofe Akwu (Delta, Igbo, Urhobo, Isoko)
- Edikang Ikong (Efik/Ibibio) – traditionally uses palm fruit base in some versions
- Afang Soup (Efik/Ibibio) – some use palm fruit juice for richer base
- Atama Soup
- Abak Soup (Efik/Ibibio)
- Palm Fruit Stew for Rice (Common across West Africa)
If you know these dishes well, you’ll agree that it is the palm fruit extract that gives them their identity.
Names of Palm Fruit Juice in Different Languages in Nigeria
Palm fruit juice is widely used across Africa, but the name differs by tribe and region:
- Igbo: Akwụ mmiri, Ncha akwu, or simply Mmiri akwu
- Yoruba: Omi banga or Omi ikinsi
- Hausa: Mai danyen banga
- Akwa Ibom / Cross River: Abak
- Urhobo/Isoko: Banga
These names all point to the same thing: that golden, milky extract that transforms your cooking.
Related Reading: Healthy Black Soup

Why I Always Recommend Extracting Palm Fruit Juice Yourself
Palm fruit juice is one of the healthiest natural cooking bases you can use. I always advise people especially if they want to cook clean, healthy meals to prepare this juice themselves. When you buy the fruits fresh, boil them, pound them, and squeeze out the juice, you are 100% sure of what you are eating and what you are giving to your family.
I personally don’t rely on the pre-processed ones sold outside. Many times, you don’t know what has been added, how long it has stayed, or how clean the process was. But when you do it yourself, you know everything from start to finish.
And the good thing is this:
Extracting palm fruit juice is not only healthy, it is also surprisingly simple and easy to do.
Whether you are in Nigeria or abroad, you can still find palm fruits in many African markets or local international stores. Once you get your palm fruits, the rest is easy, and I will guide you step by step.
Now that you already understand why palm fruit juice is so important and why preparing it yourself is the best option, let me walk you through the simple, easy, and traditional steps on how to extract fresh palm fruit juice right in your kitchen.
Let’s get started.
Related Reading: Palm oil jollof rice and beans
Tools Needed for Extracting Palm Fruit Juice
You really don’t need plenty tools for this process. Just a few basic kitchen items, and you’re good to go. Here are the things you will need:
A pot (preferably a strong one)
You’ll use this to boil your palm fruits until they become soft and tender.
A mortar and pestle (or a food processor)
Traditionally, the pounding is done in a mortar because it helps release the oil and juice easily.
But if you don’t have one, a strong food processor can also do the work for small batches.
A clean bowl
This is where you will collect the warm water and extract the juice.
A sieve or chiffon cloth
You’ll need this to strain the juice and separate it from the chaff.
A fine sieve will give you a cleaner, smoother extract.
A turning stick or wooden spoon
This helps you mix, press, and manage the extraction process properly if you don’t want to use your hand.
A kettle or flask of warm water
Warm water helps release the oil faster when squeezing and pressing the palm fruits.
A clean tray
Optional, but useful if you want to spread the palm fruits out before pounding.
Related Reading: Slow-Cooker Lean Beef Chili with Beans and Sweet Potatoes
Ingredients Needed

You actually need just one main ingredient:
Fresh palm fruits (ripe and healthy ones)
Any quantity you prefer. It could be a small bowl for a single dish or a whole bunch if you’re preparing a large soup.
That’s the beauty of this process; you only need the palm fruits, and the rest is your kitchen tools.
Related Reading: Chicken and Vegetable Stir-Fry with brown rice
Simple Step-by-Step: How to Extract Palm-Fruit Juice (Palm-Fruit Sauce)


This is the friendly, practical way I (and my mother) have always done it severally. It is the hands-on method that gives you real, rich palm-fruit sauce for soups like black soup, bitter leaf soup, banga stew and more. Read it once, then do it slowly; your kitchen will smell like home.
Choose good, ripe palm fruits
Pick palm fruits that are bright reddish and ripe. Avoid fruits that are rotten or blackened. Remove any obviously bad ones. The ripe, firm, red fruits give the best colour and flavour for the sauce.
Wash thoroughly
Palm fruits often hide dirt and little debris in them. Rinse and wash them very well until the water runs fairly clean.
Boil until tender (about 30-45 minutes)
Put the cleaned fruits into a clean pot. Add enough water so it comes a little above the fruits. Boil until the skins begin to loosen and the water turns a bit reddish and oily. This usually takes 30-45 minutes, depending on quantity.
How to know it’s done:
- The water will change colour (reddish, slightly oily).
- Take out one fruit, rub it with your finger, if the flesh peels away easily from the kernel, it’s done.
- Some fruits will show small splits or marks on the skin when they’re ready.
Turn off the heat and let the pot cool a little, not completely cold. You want the fruit warm for the next step.
Drain the cooking water
Pour the cooked fruits into a sieve or colander so excess water drains off.
Choose your extraction method (mortar, blender, or hand-squeeze)
You can use any of these three methods below I will explain each exactly as I do.
A. Mortar & pestle (traditional pounding)
Work in batches. Put a handful of warm cooked fruits into the mortar and pound gently until the pulp loosens from the kernel and fibres. Pound until the pulp is soft and broken up.
B. Blender / food processor
If you have a strong blender, work in small batches. Add a little warm water (about ¼–½ cup) to each batch to help blending. Pulse until the pulp is loosened Remember, you want a soft mash, not pulverised kernels. Warm water helps the oil come out.
C. Hand method (my mama’s way. It’s gentle & effective)
If you prefer the hands-on way, pour a small batch of the warm cooked fruits into a bowl. With clean hands, squeeze and rub the fruits between your palms to release the pulp and juice. Keep working until the flesh separates from the kernels and the juice runs freely. This is simple, traditional, and perfectly fine. Many of our mothers did it this way and I do that too sometimes.
Important: always use warm water for blending/pounding/squeezing. Warm water helps release the oil and gives a richer, fuller sauce. Avoid very cold water while extracting.
Squeeze and strain through Sieve or cheesecloth
Put your sieve or cheesecloth / muslin (or a very clean, thin cotton cloth) on top of your pot. Pour the pounded/blended/squeezed pulp into it. Gather the cloth edges and twist and squeeze firmly so the red, oily juice runs out into the bowl.
If you used a sieve, pour the pulp into the sieve and press with your hand, if yu don’t want to use your hand, you can use a spoon or ladle to extract the juice.
Rewash the fibres and repeat (to get all the oil)
Put the squeezed fibres back into a bowl, add a little warm water, knead or pulse lightly, then pour back into the cloth or sieve and squeeze again. Repeat this 2-3 times until the liquid you get is rich and red and the fibres left behind look pale and mostly dry. This step ensures you’ve removed most of the oil and juice.
How you’ll know you’re done:
- The juice you’re squeezing out is richly red and oily at first; after a few repeats it becomes paler and less oily.
- The leftover fibres should look pale and mostly free of bright colour.
- When squeezing no longer produces rich red/orange oil, you’re finished.
Final strain to remove small chaff
If you still see tiny bits of chaff in the juice, strain once more through a fine sieve lined with fresh muslin. This removes any small pieces so the sauce is smooth.
Related Reading: Baked cod with lemon-pepper, brown rice & green beans
Your palm fruit juice/sauce is ready. You can use it to cook every dish that involves palm fruit juice. I have already mentioned some of them above. Please click here to learn how to cook black soup.
Storage Instructions (Simple & Practical)
Once you finish extracting your palm-fruit juice, storing it well is what keeps the flavour fresh and the nutrients intact. Here’s how I do it in my kitchen:
Let it cool completely
After extracting the juice, allow it to cool down to room temperature. Storing it while still hot can cause quick spoilage or create steam in the container, which we don’t want.
Use clean, airtight containers
Pour the extract into clean jars, plastic bowls, or bottles with tight-fitting lids. Please avoid containers with cracks or ones that previously held strong-smelling foods. Palm-fruit extract absorbs odours easily.
Refrigerate for short-term use
If you’ll use it within the week, keep it in the refrigerator. It stays fresh for 3-4 days without losing its flavour or thickness. But remember, the fridge must be very cold.
Freeze for long-term storage
For longer storage, divide the extract into small portions and freeze. This way, you thaw only what you need. Palm-fruit extract freezes beautifully and can last up to 2 months.
How to thaw
Move the frozen portion into the fridge the night before use. If you forget (it happens to all of us), simply place the sealed container in a bowl of warm water to loosen it.
Reheating
Warm the extract gently over low heat. Please avoid high heat, it can burn fast and can make your soup taste smoky when you don’t want that.
Related Reading: One-Pot Chicken Sausage Spinach Pasta
Health Benefits of Palm-Fruit Extract (Explained Simply)

Palm-fruit extract is not just delicious, but also, it’s surprisingly nutritious. Here’s why I love using it in my home cooking:
Rich in natural antioxidants
That deep red-orange colour comes from carotenoids – the same nutrients found in carrots. These antioxidants help your body fight against free radicals, support healthy skin, and promote good eyesight.
A great source of Vitamin A
Palm-fruit extract is one of nature’s most abundant sources of provitamin A. This supports immunity, vision, and proper growth, especially for children.
Contains healthy fats
Although it’s rich, palm-fruit extract contains natural plant-based fats that support energy, brain function, and nutrient absorption. When eaten in moderation, it’s a wonderful part of a balanced diet.
Supports heart health (in moderation)
Because it’s unrefined and comes directly from the fruit, it contains tocotrienols and tocopherols (natural vitamin E), which are known to support heart health and reduce inflammation.
Boosts immunity
Its combination of vitamins, antioxidants, and natural oils helps strengthen the immune system – a good choice for families, especially during rainy or cold seasons.
Great for bone and joint support
Some studies show that the natural compounds in palm fruit may help reduce inflammation in joints, making it beneficial for the elderly.
Promotes healthy skin and hair
The natural oils help nourish the skin from the inside out, giving a healthy glow. Many people also use palm-fruit extract in homemade skin remedies because of its hydrating power.
Natural energy booster
The healthy fats provide slow-release energy, helping you feel fuller and more satisfied after eating dishes that contain palm-fruit extract.
Related Reading: Vegetarian Black Bean and Roasted-Corn Tacos with Avocado
A few gentle reminders from my kitchen
Warm water is your friend; it brings out the oil and flavour.
If you don’t have a strong blender, use your hand or use mortar & pestle.
If you don’t want any tiny chaff in the sauce, strain twice through muslin.
Keep everything clean. Ensure to wash bowls, cloths and mortar well before use.
If you plan to freeze, portion the sauce so you thaw only what you need.
Related Reading: Turkey and Veggie Meatball Whole-Wheat Spaghetti
Final Thoughts
Taking time to extract your own palm fruit juice is truly worth it. Yes, it can be a little tasking, but once you get into the rhythm like boiling, pounding, mixing, squeezing, it becomes almost therapeutic. And the best part is knowing exactly what goes into your food: clean, fresh, rich palm fruit extract that you prepared with your own hands.
With practice, you’ll find your flow. Some days you may prefer the hand-mixing method, other days the mortar will be your best friend. That’s perfectly okay. What matters is the care you put into it.
So keep doing your best in the kitchen. Enjoy the aroma, enjoy the process, and enjoy the beautiful meals that will come out of this extract. You’re doing well, and your home will always feel the warmth of your effort.
Related Reading: Sheet-pan Salmon With Asparagus And Sweet Potato Wedges
Before You Go…
Now that you’ve learned how to extract your own palm fruit juice, why not explore more of our delicious food guides? Check out our recipes for:
- Healthy Black soup
- Palm oil jollof rice and beans
- Vegetarian Black Bean & Roasted-Corn Tacos with Avocado
- Slow-Cooker Lean Beef Chili with Beans and Sweet Potatoes
- One-Pot Chicken Sausage Spinach Past
- Turkey and Veggie Meatball Whole-Wheat Spaghetti
- Sheet-Pan Salmon with Asparagus and Sweet Potato Wedges
- Homemade Kunu Drink Recipe – How to Make Healthy Nigerian Kunu Zaki with Tiger Nuts
- Grilled Lemon-Herb Chicken with Quinoa & Steamed Broccoli
And don’t forget to visit our family blog posts, where we share heartwarming stories, parenting tips, Christian living and Godly family life inspiration to help you create memorable moments at home.
Dive in, try these recipes, and let us know which ones you love the most! Your kitchen adventures and family moments are just waiting to be inspired.
Also, don’t miss our Godly films on YouTube. They are stories that bring faith to life in powerful, relatable ways. They’ll encourage you, inspire you, and help you see God’s hand in everyday moments.
Watch here: Christ Love Crusaders Ministries YouTube Channel

